By: Youtube channel @crochet_with_mokot / I’d love to see your finished project, so please tag
me on social media with #crochetwithmokot in your finished work if you choose to share.
Please credit me.
———————————————————
Pattern Title:
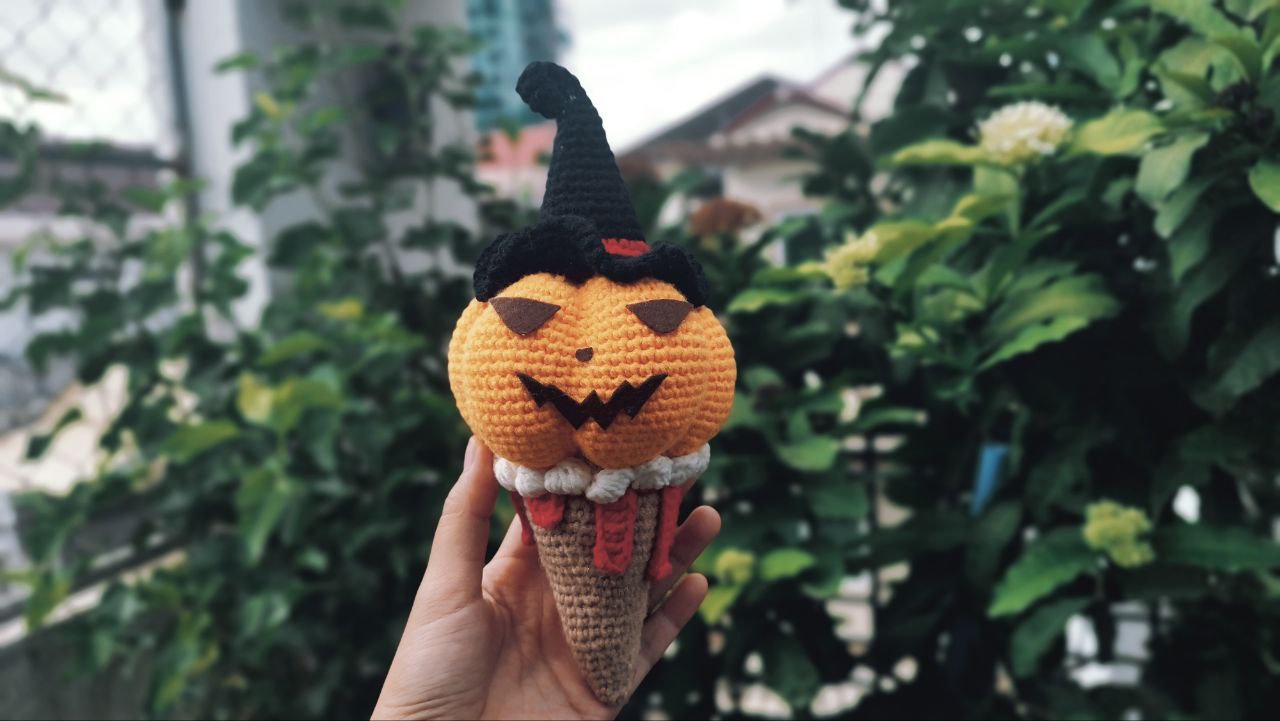
- Halloween Amigurumi Pumpkin Ice-Cream Cone – Digital Crochet Pattern
Skill Level:
- Intermediate
———————————————————
Materials:
Yarn:
- Orange milk cotton yarn
- Black milk cotton yarn
- Red milk cotton yarn
- Brown milk cotton yarn
- white milk cotton yarn
Hook Size:
- 2.5mm crochet hook
Other Tools:
- Yarn needle (for weaving in ends)
- Stitch markers (optional)
- Scissors
- Black fabric for cutting eyes or mouth shapes
- Stuffing
- Glue (optional)
———————————————————
Abbreviations (US Terms):
- mr – magic ring
- ch – chain
- sc – single crochet
- inc – increase (2 sc in the same stitch)
- dec – decrease (sc two stitches together)
- Bobble st –
- Yarn over, insert the hook into the stitch, yarn over, and pull up a loop.
- Yarn over and pull through two loops. Repeat this step 3 times
- Yarn over, insert the hook into the next stitch, yarn over, and pull up a loop.
- Yarn over and pull through two loops. Repeat this step 3 times (you’ll have 7 partial double crochets on the hook).
- Yarn over and pull through all 7 loops on the hook to finish.
- sl st – slip stitch
- st(s) – stitch(es)
- Sk – skip
- Rep – Repeat
- Rnd – Round
- FO – fasten off
———————————————————
Notes:
- This Pattern follow US crochet terms
- Number of stitches indicated between “<>”. Ex. “<23 sts total>”.
- Use a stitch marker to mark the beginning of your rounds.
- Pumpkin, witch hat, ice cream, eyes and mouth are sewn/glued together after it’s complete.
———————————————————
*FREE DOWNLOAD “Pumpkin Ice-Cream Cone” PDF PATTERN*
![]()
Pattern Instructions:
Pumpkin:
- Rnd 1: <8 sts total>
- With orange yarn, make a mr, ch1, and work 8 sc into the ring. Pull the ring tight, sl st.
- Rnd 2: <16 sts total>
- Ch1, [inc]*8, sl st.
- Rnd 3: <24 sts total>
- Ch1, [1 sc, inc]*8, sl st.
- Rnd 4: <32 sts total>
-
- Ch1, [1 sc, inc, 1 sc]*8, sl st.
- Rnd 5: <40 sts total>
-
- Ch1, [3 sc, inc]*8, sl st.
- Rnd 6: <48 sts total>
-
- Ch1, [2 sc, inc, 2 sc]*8, sl st.
- Rnd 7: <56 sts total>
-
- Ch1, [5 sc, inc]*8, sl st.
- Rnd 8: <56 sts total>
- Ch1, 1 sc in each st around, sl st.
- Rnd 9: <64 sts total>
-
- Ch1, [3 sc, inc, 3 sc]*8, sl st.
- Rnd 10-11: <64 sts total>
-
- Ch1, 1 sc in each st around, sl st.
- Rnd 12: <72 sts total>
-
- Ch1, [7 sc, inc]*8, sl st.
- Rnd 13-21: <72 sts total>
-
- Ch1, 1 sc in each st around, sl st.
- Rnd 22: <64 sts total>
-
- Ch1, [7 sc, dec]*8, sl st.
- Rnd 23-24: <64 sts total>
- Ch1, 1 sc in each st around, sl st.
- Rnd 25: <56 sts total>
-
- Ch1, [3 sc, dec, 3 sc]*8, sl st.
- Rnd 26: <56 sts total>
- Ch1, 1 sc in each st around, sl st.
- Rnd 27: <48 sts total>
-
- Ch1, [5 sc, dec]*8, sl st.
- Rnd 28: <40 sts total>
-
- Ch1, [2 sc, dec, 2 sc]*8, sl st.
- Rnd 29: <32 sts total>
-
- Ch1, [3 sc, dec]*8, sl st.
- Rnd 30: <24 sts total>
-
- Ch1, [1 sc, dec, 1 sc]*8, sl st.
- Rnd 31: <16 sts total>
-
- Ch1, [1 sc, dec]*8, sl st.
- Rnd 32: <8 sts total>
-
- Ch1, [dec]*8, sl st.
*Note: After finishing the pumpkin, insert the stuffing and tighten the ends.
To shape the pumpkin, divide the main body in half by wrapping yarn around it.
Then, divide each half into quarters, and finally, divide each quarter into eighths,
securing the yarn tightly to create the pumpkin segments.
———————————————————
Witch Hat:
- Rnd 1: <3 sts total>
-
- With black yarn, make a mr, ch1, and work 3 sc into the ring. Pull the ring tight, sl st.
- Rnd 2: <6 sts total>
-
- Ch1, [inc]*3, sl st.
- Rnd 3-10: <6 sts total>
-
- Ch1, 1 sc in each st around, sl st.
- Rnd 11: <9 sts total>
-
- Ch1, [1 sc, inc]*3, sl st.
- Rnd 12: <9 sts total>
- Ch1, 1 sc in each st around, sl st.
- Rnd 13: <12 sts total>
-
- Ch1, [1 sc, inc, 1 sc]*3, sl st.
- Rnd 14: <12 sts total>
- Ch1, 1 sc in each st around, sl st.
- Rnd 15: <15 sts total>
-
- Ch1, [3 sc, inc]*3, sl st.
- Rnd 16: <15 sts total>
-
- Ch1, 1 sc in each st around, sl st.
- Rnd 17: <18 sts total>
-
- Ch1, [2 sc, inc, 2 sc]*3, sl st.
- Rnd 18: <18 sts total>
- Ch1, 1 sc in each st around, sl st.
- Rnd 19: <21 sts total>
-
- Ch1, [5 sc, inc]*3, sl st.
- Rnd 20: <21 sts total>
-
- Ch1, 1 sc in each st around, sl st.
- Rnd 21: <24 sts total>
-
- Ch1, [3 sc, inc, 3 sc]*3, sl st.
- Rnd 22: <24 sts total>
- Ch1, 1 sc in each st around, sl st.
- Rnd 23: <27 sts total>
-
- Ch1, [7 sc, inc]*3, sl st.
- Rnd 24: <27 sts total>
- With red yarn, Ch1, 1 sc in each st around, sl st.
- Rnd 25: <30 sts total>
-
- Ch1, [4 sc, inc, 4 sc]*3, sl st.
- Rnd 26: <36 sts total>
-
- With black yarn, Ch1, [2 sc, inc, 2 sc]*6, sl st.
- Rnd 27: <36 sts total>
- Ch1, 1 sc in each st around, sl st.
- Rnd 28: <54 sts total>
-
- Ch1, [1 sc, inc]*18, sl st.
- Rnd 29: <81 sts total>
-
- Ch1, [1 sc, inc]*27, sl st.
- Rnd 30: <81 sts total>
-
- [Ch1, 1 sl st] around, FO.
———————————————————
Ice Cream Cone:
- Rnd 1: <6 sts total>
-
- With brown yarn, make a mr, ch1, and work 6 sc into the ring. Pull the ring tight, sl st.
- Rnd 2: <9 sts total>
-
- Ch1, [1 sc, inc]*3, sl st.
- Rnd 3: <9 sts total>
- Ch1, 1 sc in each st around, sl st.
- Rnd 4: <12 sts total>
-
- Ch1, [2 sc, inc]*3, sl st.
- Rnd 5: <15 sts total>
-
- Ch1, [3 sc, inc]*3, sl st.
- Rnd 6: <15 sts total>
-
- Ch1, 1 sc in each st around, sl st.
- Rnd 7: <18 sts total>
-
- Ch1, [4 sc, inc]*3, sl st.
- Rnd 8: <21 sts total>
- Ch1, [5 sc, inc]*3, sl st.
- Rnd 9: <21 sts total>
-
- Ch1, 1 sc in each st around, sl st.
- Rnd 10: <24 sts total>
-
- Ch1, [6 sc, inc]*3, sl st.
- Rnd 11: <27 sts total>
- Ch1, [7 sc, inc]*3, sl st.
- Rnd 12: <27 sts total>
-
- Ch1, 1 sc in each st around, sl st.
- Rnd 13: <30 sts total>
-
- Ch1, [8 sc, inc]*3, sl st.
- Rnd 14: <33 sts total>
- Ch1, [9 sc, inc]*3, sl st.
- Rnd 15: <33 sts total>
-
- Ch1, 1 sc in each st around, sl st.
- Rnd 16: <36 sts total>
-
- Ch1, [10 sc, inc]*3, sl st.
- Rnd 17: <39 sts total>
- Ch1, [11 sc, inc]*3, sl st.
- Rnd 18: <39 sts total>
- Ch1, 1 sc in each st around, sl st.
- Rnd 19: <42 sts total>
- Ch1, [12 sc, inc]*3, sl st.
- Rnd 20: <42 sts total>
-
- Ch1, 1 sc in each st around, sl st.
Melted Ice Cream:
- Rnd 1: <6 sts total>
-
- With red yarn, make a mr, ch1, and work 6sc into the ring. Pull the ring tight, sl st.
- Rnd 2: <12 sts total>
-
- Ch1, [inc]*6, sl st.
- Rnd 3: <18 sts total>
-
- Ch1, [1 sc, inc]*6, sl st.
- Rnd 4: <24 sts total>
-
- Ch1, [1 sc, inc, 1 sc]*6, sl st.
- Rnd 5: <30 sts total>
-
- Ch1, [3 sc, inc]*6, sl st.
- Rnd 6: <36 sts total>
-
- Ch1, [2 sc, inc, 2 sc]*6, sl st.
- Rnd 7: <42 sts total>
-
- Ch1, [5 sc, inc]*6, sl st.
Connect with ice cream cone
- Rnd 6: <42 sts total>
-
- Ch6, 4 dc from the third ch from the hook, 2 sk, sl st, 2 sc, sl st.
- Ch8, 6 dc from the third ch from the hook, 2 sk, sl st, 2 sc, sl st
- Ch5, 3 dc from the third ch from the hook, 2 sk, sl st, 2 sc, sl st.
- Ch9, 7 dc from the third ch from the hook, 2 sk, sl st, 2 sc, sl st.
- Ch12, 10 dc from the third ch from the hook, 2 sk, sl st, 2 sc, sl st.
*Note: Insert the stuffing. Then, continue crocheting following the pattern below
to close and finish the ice cream cone.
-
- Ch6, 4 dc from the third ch from the hook, 2 sk, sl st, 2 sc, sl st.
- Ch9, 6 dc from the third ch from the hook, 2 sk, sl st, 2 sc, sl st.
Cream:
- With white yarn, ch 2, [bobble st, ch 2, sl st, ch 2]*16, sl st, FO.
———————————————————
Assembly:
- Sew/glue the pumpkin onto the ice cream cone.
- Sew/glue witch hat onto the pumpkin.
- Glue the eyes and mouth onto the pumpkin.
- Weave in all ends.
———————————————————
*More detail watch my video tutorial on Youtube


